
 by Duncan McRee/photos by Bob Treat
My modular, “micro-layout,” is an On30 model railroad based on the 3-foot gauge North Pacific Coast Railroad (NPC) that once ran from the ferry terminal at Sausalito, to Duncan’s Mills, and Cazadero, California. However, only a few inches of track represent the NPC to Cazadero and to San Anselmo, California. The layout can be operated as a self-contained unit, or by using the short connection tracks to Cazadero or San Anselmo, the layout can be connected to the Dead Rail Society’s “ShelfMo” modular system as a stub terminal. When I operate it as a self-contained layout, I set it up on a portable table outdoors in the garden. When I am through operating the layout, it is stored on its side in a shed.
The Track Plan
I determined the size of my layout by measuring the space in the family SUV (with one of the backseats left up) so I would be sure I could transport it. Then I drew two yards, and connected them with a loop of track around the wide end as shown on my track plan. I added a car ferry in Sausalito as a way to get cars on and off the layout. Both yards are arranged so that all the turnouts face the same way, allowing me to “get away with” not having a run-around track. The lead track for Duncan’s Mills is only long enough for a locomotive and one car. I have played with the idea of adding a removable extension, but I find the challenge of switching with the one car limitation adds a lot of operating interest.
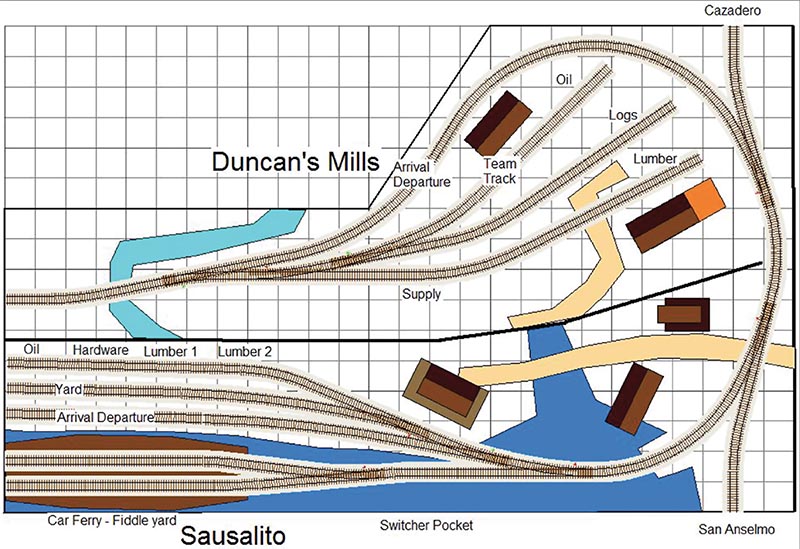
The two spurs fancifully marked “Cazadero” and “San Anselmo” on the track plan, form attachment points for other modules. When attached to other modules, my layout acts as two stub terminals, one for westbound and the other for eastbound trains.
I drew the track plan to fit Micro Engineering #5 Code 70, On30 turnouts, and Code 70 Flex-Trak. One change I made to the track plan was to shorten the car ferry, to make room for a nifty kit I found of a paddle wheel tugboat by Train Troll.
Construction
My layout structure was built entirely on ½-inch-thick Gatorfoam. This lightweight, rigid, and fl at material is similar to foamcore, but the surface skins are stronger, and the foam used is denser. I also find Gatorfoam’s resistance to warping, and moisture, superior to that of foamcore. I bring up foamcore because when I mention “Gatorfoam” to some folks, they tell me they once tried foamcore and it was not a great experience. Believe me, Gatorfoam is not your science fair project foamcore.
The only tools needed to cut Gatorfoam are a straightedge, and a sharp utility knife. I found “the trick to good cuts” was to change blades often. I built the base of the layout by laminating two ½-inch-thick layers of Gatorfoam together to make a 1-inch-thick base. Yellow glue holds the layers together, and 1-inch-long deck screws bind the layers until the glue dries.
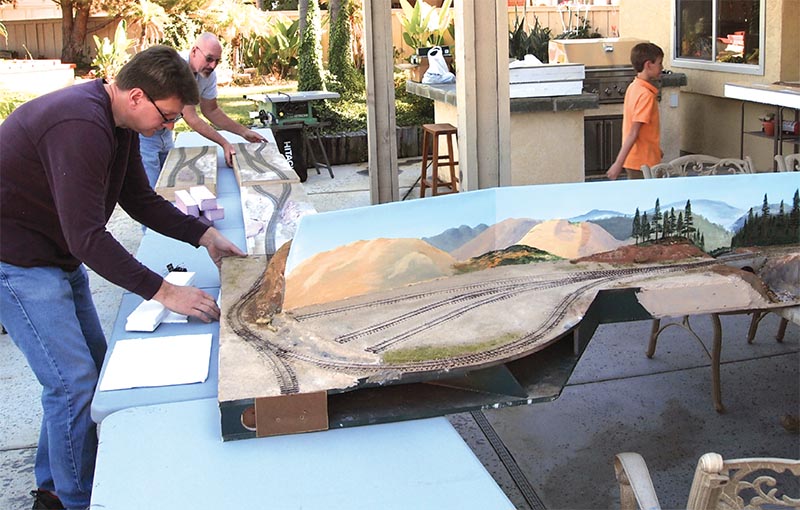
Test fitting the author’s modular layout at a Dead Rail Society meet. Pieces of styrofoam were used to adjust height, while a module is being added in the background.
A single layer of Gatorfoam was used to build the sub-roadbed for the track with vertical pieces to give elevation, and make a box structure for rigidity. A Gatorfoam backdrop down the center of the layout gives the whole module strength, and divides it down the middle into two scenes, making the layout feel larger than it actually is.
With the sub roadbed completed, I printed out the track plan actual size, and used this print to layout the track, assuring accurate, kink-free track work.
Then I started laying track by gluing down the turnouts, and adding flex track. All the track was glued down with white glue, and ballasted with dirt, also held down with white glue.
The Scenery
My friend Byron, who is in the surfboard business, supplied me with large, thick, chunks of really nice styrofoam leftovers from his shop to use for the base of my scenery. I am used to plaster scenery, so it took me some trials to learn to paint and texture the stryofoam convincingly. I used lightweight Spackle to fi ll in the spaces between the chunks of styrofoam. Frankly, if it were not for my need to have a light-weight, easily-moved module, I would have used plaster to create “rocks.” Plaster, after all, is ground-up rock.
The scenery was then painted with craft-store paints. A light grey was used for the base coat and then darker shades mixed with umber, ochre and sienna were speckled over the Spackle. Once dry, the painted scenery was coated with thinned white glue, and sprinkled with decomposed granite that I picked up in the local hills, to give it texture. Finally, ground foam was added to represent grass and bushes.
Deciduous trees were modeled using Laurel Sumac flowers collected on my walks in late winter and coated with Noch foliage. In late winter, the seeds have fallen off the flower buds, and the resulting armature looks convincingly like a tree. This plant is very common across Southern California. The fir trees were made by Canyon Creek Scenics in Oregon, and are far nicer than anything I can make.
I originally finished the edge of the Duncan’s Mills’ side of the layout with fascia boards. However, later the green fascia was completely covered with foam “rocks” to hide its edge in photos. I am much happier with the look of “rocks,” and the foam makes a durable “bumper,” protecting the layout during transport.
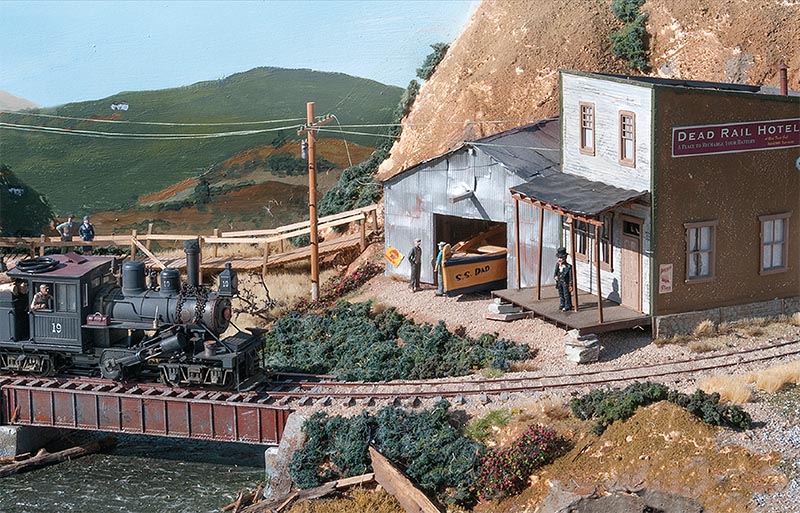
The Dead Rail Hotel is a favorite hangout in Sausalito, and the ideal place to recharge your batteries. The porch is well suited for watching operations.
Early in construction, I brought the module to a Dead Rail Society meet; test-fitted it to other modules, and let the members give it a critical examination. As it turned out, the module “had an issue” with the turnout leading to the Cazadero connection. The fast change of grade there had warped the turnout, and the more fiddling we did with it to keep it in gauge and level, the worse it got, until finally I decided to replace the turnout. This is where the wisdom of using white glue to hold the track and ballast comes in. By simply soaking the area with water for a few hours, the old track and ballast was easily scraped off.
Going Dead Rail
Radio-controlled locomotives have been around for many years, but mostly in the larger garden scales. Recently it has become possible to power the smaller locomotives in HO and On30 using smaller radios and lithium ion batteries. The DRS1 system I used piggybacks on the DCC decoders already in most commercial locomotives. All the functionality of DCC is preserved, including the ability to program the decoders over the radio. It does mean that you need to keep the batteries charged. The flip side of using batteries with a long discharge time is that they have a long charging time. All my locomotives have a way to quickly swap a fresh battery in for a used one, so there is no waiting for batteries to recharge in place. I need to reveal here, that Janice Yuwilier and I own Tam Valley Depot, and are suppliers of Dead Rail components – and more.
Since no track power is needed, I went a little overboard on painting the rail with coats of enamel, and ballasting it with liberal amounts of dirt. The first runs of locomotives over the track were decidedly “crunchy.” The dirt was scraped off as needed until my locomotives ran well enough to stay on the track. I have found over the years, that On30 models don’t stay on track well enough to truly model how rough real narrow gauge track often was. Another thing I had to watch with Dead Rail is that derailed locomotives happily keep going over the dirt, and off table edges unless stopped. Before you know it, you a have a runaway Porter on your hands.
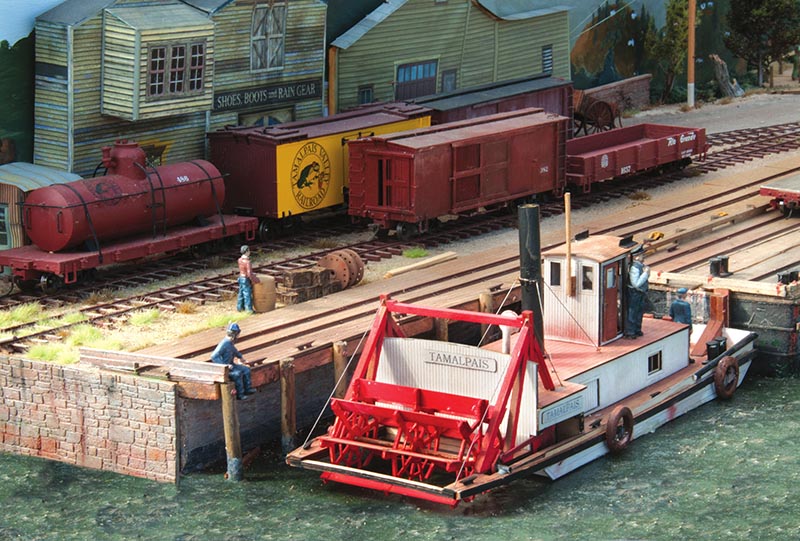
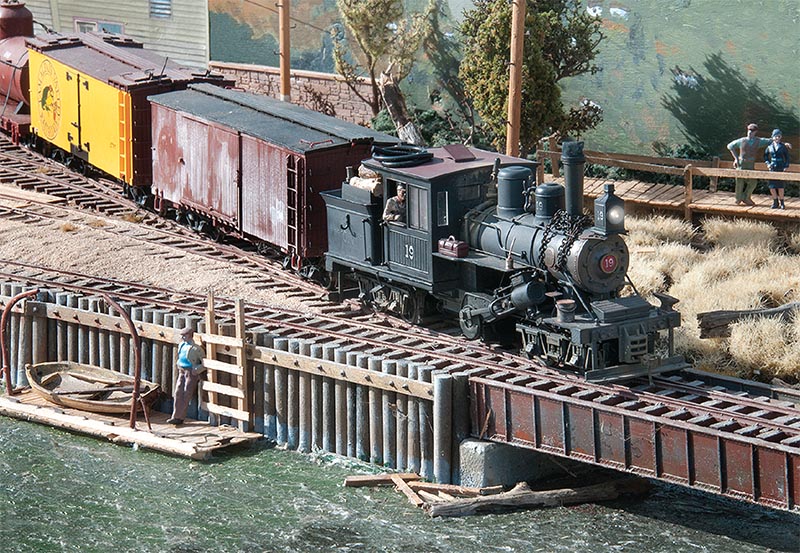
The car ferry Tamalpais has arrived at Sausalito, and its captain, Giant Malloy, is impatiently awaiting a new load. The buildings along the backdrop were printed on paper using an inkjet printer. They were then liberally coated with satin varnish to withstand weather. The ferry was assembled from a Train Troll kit.
Operation
In stand-alone mode, my layout is operated as follows: Two locomotives are used, one acting as a switcher, and the other as a road locomotive – although one locomotive can serve both roles if needed. One of the yard tracks in Sausalito is designated as the departure/arrival track, and this track is used to make and break-up trains. The switcher removes cars from the car ferry, and replaces them with outbound cars. Then inbound cars are swapped for outbound cars in the yard to make a new train. The switcher moves into the pocket on the car ferry lead, and a road locomotive is placed on the train.
The train is then moved to Duncan’s Mills where the track in front of the depot serves as the departure/arrival track. Inbound and outbound cars are swapped to make-up a new train. The yard lead can only accept one car and a locomotive, so this process takes a bit of thought, but eventually even the greenest crews get the job done.
The train then returns to Sausalito by backing-up. The road locomotive leaves the train on the arrival/departure track, pulls out of the way, and the process repeats with the switcher taking over.
This article appeared in the July/August 2017 issue of Narrow Gauge & Short Line Gazette
