

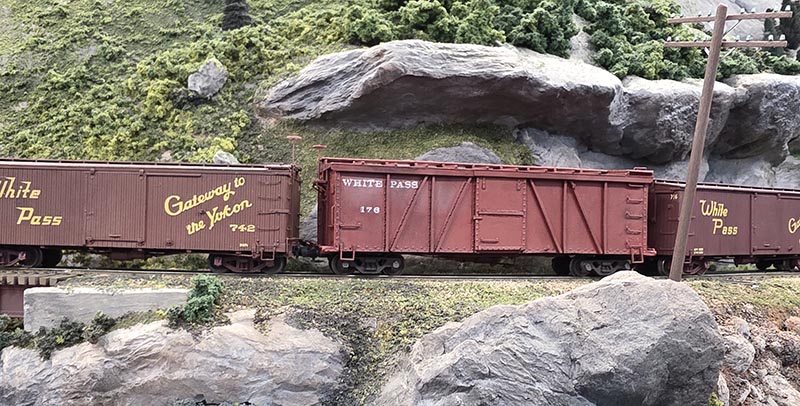
 Rob Bell/photos by the author except as noted
I like narrow gauge railways and I specifically appreciate American narrow gauge lines. Most states in the U.S. had narrow gauge railroads at some point. Alaska, California, Colorado, Hawaii, Ohio, Pennsylvania, and Utah had ones that most of us recognize. Many had unique rolling stock that were and are easily recognizable. The White Pass & Yukon Route got equipment from all over the U.S. during World War II, but that wasn’t the end of it. The WP&YR bought sixteen narrow frame tank cars in 1962 that had been in service on the D&RGW. The line also bought fifteen East Broad Top steel hoppers for ballast service in 1968.
The East Broad Top was a favorite of my dad’s. He was born in Pennsylvania and was a fan even though he never got to see it in person. What if the U.S. Army had acquired some equipment from the EBT during WWII? The famed EBT steel hoppers probably couldn’t have been taken during WWII as the coal hauled was critical for the war effort at the time. What about the EBT’s steel boxcars? What if the Army had appropriated a boxcar or two and shipped them to Alaska for the war effort there and the WP&YR inherited one or two after the war was over?
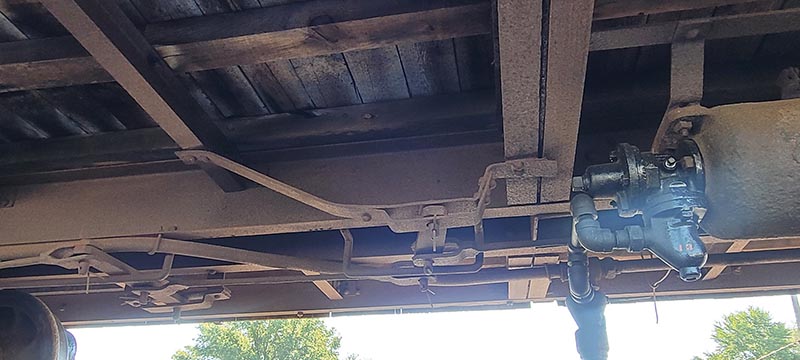
A photo by the author showing the intermediate live lever and the associated brake rigging on EBT #170 in July 2022. While this car is not an all-steel car, it does share the same brake system setup as the all-steel cars.
The EBT built ten all-steel boxcars between 1913 and 1916. The cars had outside bracing and rode on cast steel Vulcan trucks like their steel hoppers. The earlier cars had a horizontal brace on the doors and I felt this would be a neat detail to model. It also happens that the prototype number 176 had this brace and was retired in 1943, making it a perfect fit for my version of history. A great resource for this build was the Quick Pic book by Tim Mulina from BHI Publications (www.quickpicbooks.com). This book is loaded with detail photos and a bit of history about the surviving boxcars. I bought a Funaro & Camerlengo resin kit number 1005 for an EBT steel box-car in HOn3 some years ago at an RPM meet in Cocoa Beach, Florida. (RPM stands for Railway Prototype Modelers; think of these guys as standard gauge rivet counters whose modeling and weathering techniques are unsurpassed —not unlike many of us narrow gaugers.) Steve Funaro was giving a clinic on how to build a resin kit and I sat through his clinic then. He had some great pointers and I’ll try to cover them here along with a few of my own. As with most things in life, there is more than one way to skin a cat (or beat a dead horse), and what works for me may not work for you. Just remember that if I can do it, so can you.
The kit instructions are good for a general idea of how the kit goes together, but there is a lot left out. Read the instructions all the way through first to familiarize yourself with the parts and the suggested order of construction. Beyond that, they leave out an awful lot of possible detail that could have been addressed. My layout has Grandt Line (now San Juan Details), Micro Trains Line, Blackstone, and brass rolling stock, so this car’s detail level had to match the rest of the fleet. The height of my layout also dictates that brake rigging be detailed to the same level as the other cars.
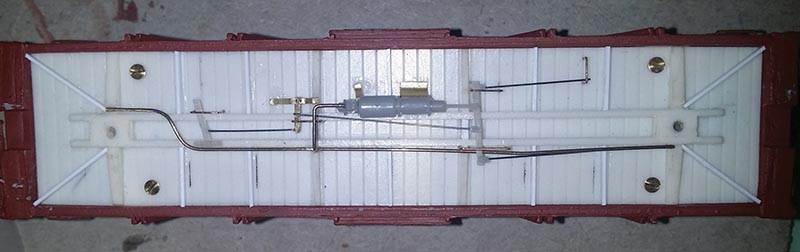
A lot of research went into figuring out the proper layout of the brake rigging on this model. Unlike other narrow gauge K-brake systems, the EBT system uses an intermediate live lever toward the “A” end of the car. This lever, its bracket, and the brake cylinder brackets were formed from thin brass sheet. The hangers are a mix of 0.010” music wire and phosphor-bronze wire. The brake rods are 0.010” music wire. The additional frame members are HO scale 2˝x4” strip styrene.
The parts for this kit are a white resin and poured flat. The thin overflow acts like a fret, or a sprue, to hold the parts together until needed. The best way to remove the parts, especially the smaller ones, is to place a sheet of fine sandpaper on a very flat surface and sand away the back of the part. I used at least two different grits of sandpaper; 150 and 320, to accomplish this. Do not remove the small parts until you need them as this helps keep the parts within this particular universe and available when you do need them.
Steve had a great suggestion for assembly that involves styrene, liquid styrene cement, and ACC. The idea is to position small blocks of styrene at a joint and use liquid styrene cement to hold them in place temporarily. The styrene cement will soften the styrene enough to make it tacky and it will stick to the resin as long as no stress is applied. This allows the position to be adjusted for an absolutely perfect fit. If need be, add a touch more cement and reposition. When happy with the placement, allow to dry. Next, carefully apply a small amount of ACC around the edges of the styrene block. I have to say that I was skeptical when I first tried this, but it really is a great way of assembling these types of kits…