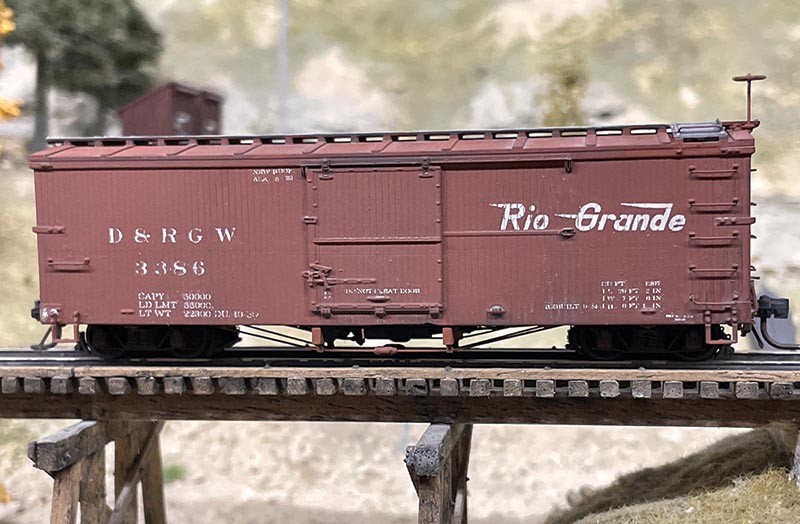
HOn3 D&RGW 3000-series boxcar and 5500-series stock cars in easily assembled 3D printed kits. These are available via an eBay page for $20.00 each, plus shipping. I’ve assembled a standard-door boxcar kit for this review. The kit came well-packed with two major parts, the almost-complete body, and a detailed underframe, along with detail parts for stirrup steps, brake wheel, turnbuckles, coupler pocket covers and trucks ready to take Kadee 718 wheelsets (not supplied). These were all neatly packed inside the body print.
Also included is a generous length of fishing line for truss rods, and screws to attach the trucks. The model is set up to accept Kadee 713/714 couplers (not supplied.) A grab-iron bending jig, also 3D printed, is included which not only helps bend the grabs accurately, but also includes test points to check them, including for the end grabs with upbent ends. It even includes a length guide for cutting the handbrake staff.
I started assembly by cleaning all the 3D printed parts with some Isopropyl Alcohol with a small brush and letting them dry in a well-ventilated area. I then inspected the parts carefully. The underframe had supports under some of the brake gear parts left from the printing process. These are easily removed with nippers and tweezers or left in if you’d rather, since they will not show in normal use. There was also a fair bit of cleanup required at the bottom of the body sides and ends, which I tidied up with a small chisel and sanding sticks. I also had to carefully pare inside the body at the bottom of the false internal walls to get the underframe to fit. The roof panels and ribs do show some striations from the printing process, which I smoothed off a bit using a small chisel and some fine files. Once the car is painted, they don’t show when the car is in use on the layout.
I then drilled out all the grab iron holes with a #80 drill and bent up the grabs using the supplied jig and some .010-inch brass wire. I installed all but the lowest, not forgetting those in the roof walks. Then I test fitted the couplers to the frame, noting that I had to clean the pegs in the boxes up a little to ensure the couplers articulated, and even then, they were not perfect. I have raised that issue with Eric Hayward, owner of Gato Model Works. I think there is a minor dimensional issue with the slots for the centering pegs. Then I tried to add the wheels to the trucks and get them to turn freely; and in doing this, broke one truck getting the wheelsets in. Eric Hayward has reported that some truck frames have broken in transit and offers on the Facebook page to replace them if required. Therefore, the car in the photo is riding on Grandt Line (now San Jan Models) 5110 trucks.
I added the fishing line truss rods, noting that the turnbuckle parts are modeled with the boards sometimes seen in turnbuckles which stopped them loosening over time. I had to do a little cleanup in the turnbuckles to get the fishing line through them. For my own superdetailing, I also added the brake cylinder dump rod and the retainer line to the triple valve. After weighting it with an extra ounce of lead sheet, I glued the frame into the body with a little ACC and added the remaining grabirons to the body. For the review model, I did use the supplied brakewheel and stirrups, but note that these are fragile. Indeed, I broke one brakewheel, and was glad of the second one; all the small parts are supplied duplicated just in case! On subsequent cars, I will probably substitute Grandt Line/San Juan Models parts here. I also scratchbuilt some brake hoses and added them to the car ends.
Final cleanup was simply done with a little more IPA, and the car airbrush painted with enamel paints. Thinfilm decals were applied in the normal way with Walthers Solvaset, and the model then weathered. The completed car sits very well in a train with both Blackstone and Rail Line boxcars. I’m very pleased with the result I was able to achieve with this kit, and welcome these cars to the HOn3 world.
Gato Model Works
Beaverton, OR


